The starting harness: Pi
Objectives of this module
- Understand why we start from Pi
- Launch Pi and understand the role of the
.pi/directory - Situate the four extensions we will use to embody the building-block grid
- Frame the reconstruction exercise honestly
We saw earlier that a harness is a set of tools on top of LLM models, each of which contributes to accomplishing a task autonomously. You have a set of ready-made harnesses at your disposal: Claude Code, Codex, OpenCode, Pi... In most cases, however, you have no control over them: you let yourself be guided, hoping the tool does what you asked, and when something goes wrong, it is not necessarily easy to understand why. Yet our goal is precisely to understand how a harness works in every last detail, to be able to easily add or remove an element from it, and to test the consequences.
In what follows, we will use Pi, an open, extensible and minimalist command-line code agent. It interests us precisely because you can simply add extensions to it and understand everything that happens inside, without surprises: end-to-end control.
What Pi is
Pi is a code agent initially created by Mario Zechner, which runs in your terminal. Its primary purpose was precisely to have control over its harness. Pi relies on a handful of basic tools (read a file, write one, edit it, run a shell command) and on an agentic loop that chains model calls, tool execution and the review of results. This is exactly the loop we described in the previous module, reduced to its simplest expression.
Around this core, Pi exposes a system of extensions and events. You can hook into the important moments of the loop with pi.on(...), the same way you attach hooks in Claude Code.
Just as Claude Code relies on a .claude/ directory, Pi relies on a .pi/ directory. That is where the configuration, skills, agents and permission rules live. You can think of it as the Pi-side equivalent of what you may already know from Claude Code.
Pi's "system prompt" describes its entire operation, as you will see in a moment; Pi is therefore able to help you extend its own features.
Getting started
To install Pi, go to the official website and let it guide you.
You then need to declare the models you will use throughout your experiments; the ways to configure your model provider are described in the documentation. We encourage you to have a solid model for good-quality planning and a faster model, which will code the tasks as the planner defines them.
For those of you taking this training in person, we suggest using the models made available by ILaaS, a shared platform from the French academic world, for trustworthy generative AI.
Edit the ~/.pi/agent/models.json file and fill it in as follows:
{
    "providers": {
        "ilaas": {
            "baseUrl": "https://llm.ilaas.fr/v1",
            "api": "openai-completions",
            "apiKey": "XXXXX",
            "models": [
                {
                    "id": "gemma-4-31b",
                    "contextWindow": 128000,
                    "reasoning": true,
                    "cost": { "input": 0.14, "output": 0.28, "cacheRead": 0.0028, "cacheWrite": 0 }
                },
                {
                    "id": "qwen-3.6-35b-instruct",
                    "contextWindow": 256000,
                    "cost": { "input": 0.14, "output": 0.28, "cacheRead": 0.0028, "cacheWrite": 0 }
                }
            ]
        },
    }
}
You will need to enter the API key that was provided to you. The models listed are those available at the time of the training; the up-to-date list is on the ILaaS website.
The cost block is not provider data
The cost field is optional and defaults to zero. Without it, the /session command will report a cost of €0.00 on all your sessions, which would deprive you of an indicator we will use extensively later on.
The rates above, expressed per million tokens, are the market rates for a model of comparable size. They do not correspond to any real billing: your ILaaS usage is not billed per token. They are only there to give an order of magnitude.
Above all, keep this in mind, because it is already a harness lesson: the cost displayed by a coding agent is not information received from the provider; it is a multiplication performed from a configuration field you wrote yourself.
If everything went well, you can use Pi. Start a first interactive session with pi in your terminal and check that you get a prompt like this:
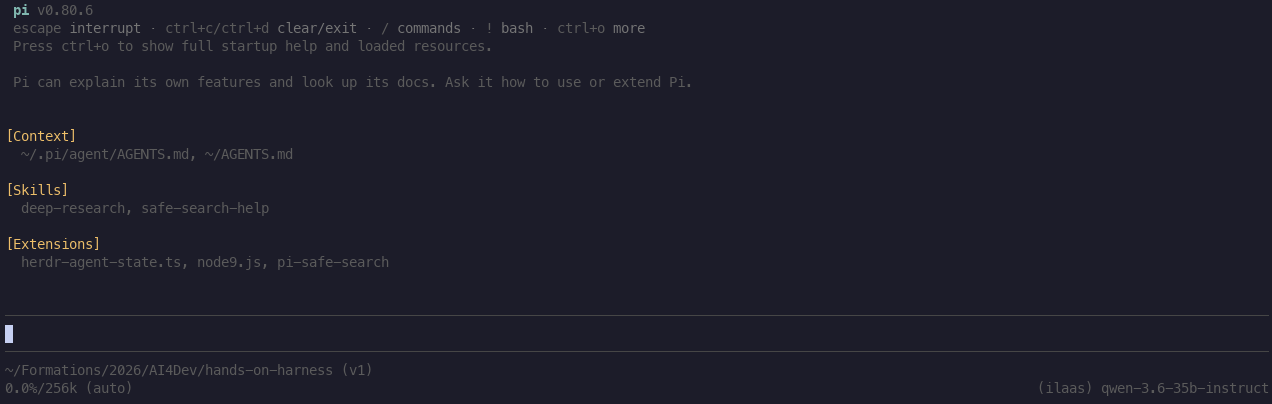
You can see the different elements that make up Pi (context, skills, extensions) as well as the default model at the bottom right (here (ilaas) qwen-3.6-35b-instruct).
You can play with it by asking questions, observing the loop and seeing how it responds. Then try non-interactive mode with pi -p, which runs a request and gives control back.
The first useful commands
Tools
As mentioned in the introduction to this part, Pi ships with four tools. To get the list, just type
/toolsYou should see at least the read, bash, edit and write tools.
Exercise (in class)
From the prompt, try to trigger each of these tools with your question.
Your session tree
It can be useful to navigate your session and restart from one of the steps of your discussion. To do this, use the command
\treeExercise (in class)
Try picking up from a point in your discussion thread.
Resuming a previous session
You can restart from any previous session using the command
\resumeExercise (in class)
Try resuming a previous session.
Exporting your session
Finally, you can export your session to HTML or JSON format via the command
\exportExercise (in class)
Export your session to HTML (the default format) and open the file.
We have covered the main commands we consider useful for now; we will see others as the training progresses.
Understanding the contents of Pi directories
Pi distinguishes two directories with the same name .pi/, and you need to learn to tell them apart right away so you don't get lost.
The first lives in your home directory, ~/.pi/agent/. It is the global configuration, the one that applies by default to all your projects: you already touched it when you edited ~/.pi/agent/models.json to declare your model providers. You'll also find settings.json there, for general preferences (default provider and model, theme, proxy...), and trust.json, which remembers from one session to the next the projects you chose to trust.
The second lives at the root of your project, .pi/, the one you version along with the rest of the repository. It holds what is specific to the current project: a settings.json that overrides the global one (nested objects are merged, not replaced as a whole), and above all the directories we'll fill ourselves throughout the training, starting with skills/ for the tools we'll write.
This distinction is not just a storage convenience. Skills declared in the global directory load without any particular check: they follow you everywhere. Those from the project, on the other hand, only load once that project is marked as safe, precisely in the trust.json mentioned above. This is a very concrete first look at the safety building block we'll rebuild later: a harness that would execute code found in any cloned repository without discernment would be a flaw in itself.
Keep this simple rule for what follows: anything that must apply everywhere goes in ~/.pi/agent/, what is specific to the NÉON repository goes in its local .pi/, and it is this second directory we'll populate over the modules that follow.
Extensions
Pi is not limited to its four basic tools and is completely extensible. You can add any action to it through the pi.on(...) mechanism already mentioned, which lets you modify the behavior of the agentic loop. You can also change the user interface, the TUI, by adding information to its various zones. These two mechanisms make you the architect of your harness: just write an extension for your needs, distribute it, or use ones written by the community. To find them, the official gallery at pi.dev/packages is the best entry point.
An extension is distributed as an npm package or a git repository, and installs with pi install:
pi install npm:@tintinweb/pi-subagents
pi install git:github.com/user/repo
By default, the installation is global: the package is placed in ~/.pi/agent/npm/ (or ~/.pi/agent/git/<hôte>/<chemin> for a git repository), and the extension becomes available in all your Pi sessions, across all your projects. Add -l to the command to install it locally instead: the package then lands in .pi/npm/, and the extension is active only for that project, once it has been marked as safe, exactly as we saw in the previous paragraph for skills. To remove a package, the symmetric command is pi remove npm:@foo/bar.
To try an extension without installing it, whether it is a package or a simple local file, the -e option (or --extension) loads it for the duration of the current session only:
pi -e npm:@tintinweb/pi-subagents
pi -e ./mon-extension.ts
This is the reflex to adopt before committing to an extension found in the community directory. Keep in mind, however, that an extension runs with all your system permissions: only install and test what you are willing to run with confidence.
The combo extension
For the rest of the training, you will only have to install one extension specially designed for it. We strongly encourage you to look at what exists, to test, and to step back from your experiences. It sometimes happens that an extension makes us lose control of our harness and triggers events that degrade the results.
Exercise (in class)
Install the combo extension locally (-l):
pi install -l npm:@ai-for-dev/combothen check that it shows up in .pi/npm/. Launch Pi: you should see it in the extensions section. You can then try removing it with pi remove.
Going further
- The official Pi website and its documentation.